Wednesday, October 26, 2016

Book Review: Radical Beauty

I am always on the lookout for ways to improve my health and beauty routines and I have been a fan of Deepak Chopra since I was young, I remember my mother being interested in his work and reading his books. Radical Beauty by Deepak Chopra and Kimberly Snyder is chock full of useful information. The book looks at beauty holistically with an emphasis on Ayurvedic medicine.

In addition to providing recipes to improve circulation and keep skin hydrated there's also information on optimal amounts of macronutrients and foods to limit/avoid. While I haven't tried any of the recipes in the book I am excited to try the Glowing Green Smoothie. I do try to start my mornings with a room temperature glass of water, which is another tip in the book. According to Radical Beauty, liquids we consume should be taken in at room temperature for optimal health.

The book is jam packed with information, it did take me longer to read than most books but that could be because I was really trying to soak in the information. Because there is so much information I feel like I can pick and choose which items fit my lifestyle and what I can add to my daily routine. Hopefully I will be looking and feeling younger in no time!

I received this book from the Blogging for Books program in exchange for this review.


Saturday, September 24, 2016

Weight Loss

Growing up I was always thin. I never had to worry about my weight. My diet consisted of junk food, I ate fast food whenever I wanted and hardly ever ate a real meal. I also never exercised. EVER. In P.E. I would walk the track instead of run it. I would do the bare minimum just to keep my grade up. I even took badminton for P.E. my sophomore year just to ensure I got the least amount of physical activity possible. I knew eventually my lazy bad habits would catch up with me but at the time I didn't care.

I had my first daughter when I was 20. I had my second daughter when I was 22. Having two kids in such a short amount of time was tough of my body. I had my third daughter when I was 24 and my fourth when I was 30. After having my third daughter I expected to lose a little weight, like I had with the previous two pregnancies, but I didn't. The weight stuck around and when I got pregnant with my fourth daughter I weighed as much at the beginning of my pregnancy as I did when I gave birth to my third. After the fourth I lost no weight. I stayed that weight for five years.

For about the last 10 years I had worn a size 16. I hated it but I loved junk food more. Earlier this year I had to buy a size 18 pant. It was depressing, but I still didn't care enough to change my life. It wasn't until after my birthday in February that I decided to do something about it. In March 2016, Rob and I both decided that we were tired of being fat and tired. We started by changing our diets and giving up fast food. We also started working out. We would use our weight machine in the garage for 30-45 minutes a day, most days of the week. I also started walking on the treadmill that had been used as a coat rack for years. The diet part was easy for me, I like healthy food just about as much as I like junk food but the working out was the tough part for me, and it still is. I have to make myself do it because once I do I feel so much better.

I have have lost 42 pounds and 5 inches from my waist. I have also lowered my total cholesterol from 190 mg/dL one year ago to 132 mg/dL just this month. My triglycerides number was 299 mg/dL one year ago and are now it is at 112 mg/dL. My BMI has gone from 30.3 to 26.3. I now wear a size 12. All without any magic pill, wrap, cream or crazy diet.


BEFORE - Christmas 2014. I gained 10 more pounds between this one and my after photo.


AFTER - July 2016. Excuse my messy closet.

 I still have more weight to lose, and it's going a lot slower now but I know I will eventually reach my goal and I will maintain it. Besides the weight loss I am so much healthier and happier. I am able to be more active than I have ever been. One year ago we went on a five mile hike and I thought I was going to die. A few weeks ago we went on that same hike and it was a piece of cake. I am excited to continue this lifestyle for the rest of my life.

Thursday, September 15, 2016

Gluten-Free For Good by Samantha Seneviratne

I have been eating gluten-free since March 2016. I have spent years with stomach/digestive issues. For some reason it took me a long time to realize it probably had something to do with my diet. I assumed it was dairy, I had tried to cut dairy out a few times in the past and felt okay for a little while but my love of cheese was too strong and I'd always cheat within a week. We went to lunch to celebrate my birthday in February, after lunch Rob and I went for walk at one of our favorite parks in Nashville. My stomach hurt so bad that we had to turn around and go home a few minutes after arriving to the park. That day I thought about what I ate. I had a turkey club sandwich at lunch. Something finally clicked in my head, I thought "what if is isn't dairy, it's gluten?". My mom has been gluten-free for years but I never thought of trying it myself. After that day I decided to cut out dairy and gluten. I didn't last long without dairy and starting eating it again after a few weeks. I stuck to not eating gluten longer and noticed that I felt better, the sores in my mouth had gone away and my stomach wasn't killing me anymore. It has been hard to stick to a gluten-free diet, especially in a house with four kids but so far I've done pretty well.

I am always on the lookout for a cookbook that will allow me to make delicious gluten-free foods. When I had the opportunity to review Gluten-Free for Good by Samantha Seneviratne I jumped at the chance!

gluten free for good
(photo credit: jenloveslife)
The cookbook is beautifully photographed. I enjoyed that Senevirante provides a list of gluten-free pantry staples. Another plus for me is that none of the recipes call for any sort of gum. I am not opposed to using a gum in recipes but I do prefer cheap and easy recipes, adding gums to a recipe does scare me so I typically avoid recipes that call for a gum.

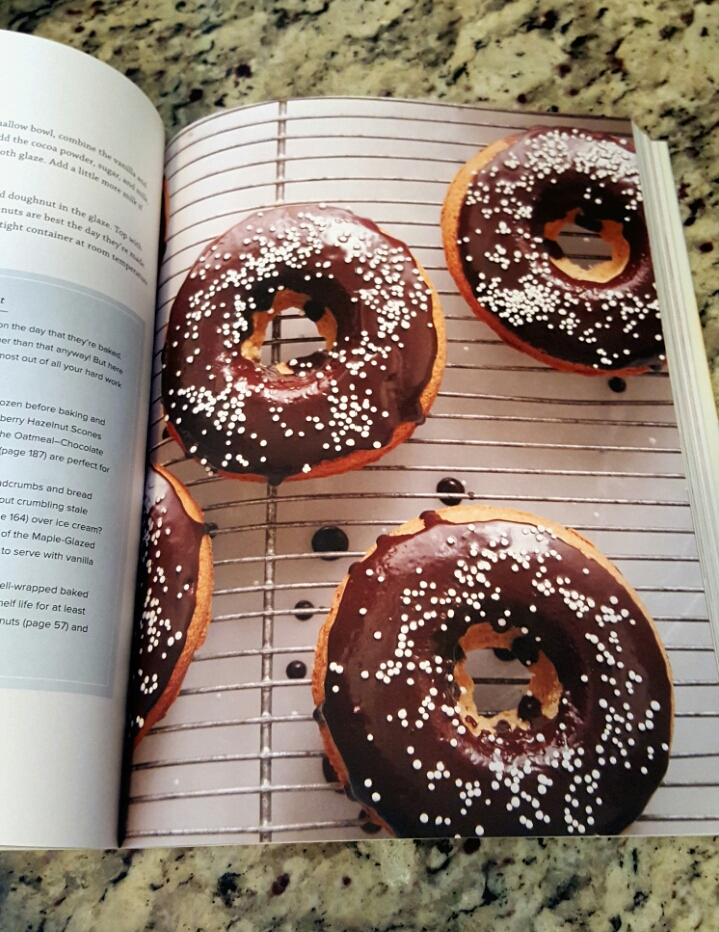
There are so many tasty recipes it was hard to decide what to try first. I have made the Sweet Potato and Spinach Hash, it was so easy and delicious. I did leave out the mint because I didn't have any on hand. Next I would like to try the Chocolate Toffee Popcorn and the Spiced Doughnuts with Mocha Glaze. I am a sucker for sweets so both of these just sound too good not to try!

gluten free doughnuts
(photo credit: jenloveslife)
I would recommend this book to anyone who is looking for a gluten-free cookbook full of easy to create, delicious recipes. All of the recipes in the book call for readily available ingredients, almost all of the recipes called for items I have seen at my local grocery store. If there was something I wasn't familiar with I would just look for something similar to sub in its place. For example, the Amaranth Tart with Kale, Caramelized Onions, and Gruyere calls for Lacinato kale, I don't know what that is and my grocery store has regular kale or purple kale so I will just replace the Lacinato kale with whatever the grocery store has at the time. The tart looks amazing, I can't wait to make that soon.

I received this book from the Blogging for Books program in exchange for this review.

Monday, March 21, 2016

No Bake Gluten Free Oatmeal Bars


I am always trying to find something filling that Kid 3 can eat in the morning. Cereal typically upsets her stomach as does just about anything with dairy or wheat. I found a recipe for Coconut Mocha Vegan Protein Bars on Pinterest. I modified the recipe somewhat to suit Kid 3's tastes.

We use Bobs Red Mill Gluten Free Rolled Oats (affiliate link). I buy my coconut milk at my grocery store. There are several brands to choose from, I buy whatever happens to be the cheapest. I have yet to notice a difference in quality between the brands available at my store.

Gluten free and dairy free (if you use dairy free chocolate chips, I did not). These bars are great for an afternoon snack or as a filling breakfast bar.
No Bake Gluten Free Oatmeal Bars

by Jen Loves Life
Cook Time: 0
Keywords: breakfast dessert snack gluten-free vegetarian oatmeal coconut milk coconut chocolate 
Ingredients (12 Bars)
  • 3 cups gluten free rolled oats
  • 4 tablespoons ground flax seed
  • 1/4 teaspoon sea salt
  • 1 cup sunflower seed butter (or your favorite nut butter)
  • 1 teaspoon vanilla extract
  • 1/2 cup semisweet chocolate chips
  • 1/2 cup unsweetened shredded coconut
  • 1 can full fat coconut milk
Instructions
Line a8x8 baking dish with parchment paper. Allow for the paper to hang over the top of pan.
Use a food processor to grind the oats into a course meal, leaving some larger pieces of oats in the mix. Pour the oat meal into a large mixing bowl.
Add dry ingredients to oat meal. Stir to combine.
Add coconut milk and mix. Next add vanilla and sunflower seed butter. Mix well.
Pour in coconut and chocolate chips. I prefer to use mini chocolate chips because it just feels like there's more chocolate even though there isn't.
Transfer the mixture to the baking dish. Press the mix into the pan firmly. Cover pan and refrigerate for 20 minutes or longer.
Once bars have chilled remove from refrigerator. Lift block of bars from the baking dish using the extra parchment paper. Cut the bars into six long strips, then cut the strips in half.
I melted chocolate and coconut oil in the microwave and drizzled on top with a little bit of the unsweetened coconut, this step is optional.
Store the bars in an air-tight container in the fridge.
I store mine in freezer. Kid 3 just grabs one in the morning and sets it out of the counter while she gets ready for school and by the time she's done it's defrosted and ready to eat.
Powered by Recipage

Friday, March 18, 2016

Gluten Free Burrito Bowls


I love a good, messy burrito. I haven't eaten a burrito since going gluten free. I have been craving them big time. I made these chicken burrito bowls a few nights ago for the family and they were a big hit. They are so quick and easy to throw together. It might be my new favorite dinner!

Gluten Free Chicken Burrito Bowl

by Jen Loves Life
Prep Time: 10 minutes
Cook Time: 30 minutes
Keywords: grill entree gluten-free quinoa chicken
Ingredients (4 servings)
  • 2 cups cooked quinoa
  • 4 chicken thighs, boneless skinless
  • 1 can black beans
  • 1 can white corn
  • salsa verde
  • guacamole
  • sour cream
  • black olives
Instructions
Cook quinoa according to package directions.
Drain corn and black beans. Heat each separately in small bowl in microwave, about 2 minutes each.
Cook chicken. I grilled the chicken thighs on a stovetop grill pan but you can also bake the chicken until cooked all the way through, approximately 30 minutes. Dice chicken.
Add 1/2 cup cooked quinoa, 1/2 cup black beans and 1/2 cup corn to a bowl. Add diced chicken on top. Top with 2 tablespoons light sour cream, 2 tablespoons guacamole (I like Wholly Guacamole). Drizzle a few tablespoons of salsa verde and add a few sliced black olives. Enjoy.
Powered by Recipage

Wednesday, March 16, 2016

Three Ingredient Peanut Butter Cookies


These cookies are so easy to make and my girls love them. We make these all the time. Sometimes we add chocolate chips which almost make the cookies taste like a Reese’s Peanut Butter Cup. I like to use crunchy peanut butter but the girls prefer smooth peanut butter.

There are only three ingredients; sugar, peanut butter and an egg. The cookies are gluten free and dairy free.

3 Ingredient Peanut Butter Cookies

by Jen Loves Life
Prep Time: 5 minutes
Cook Time: 15 minutes
Ingredients (20 small cookies)
  • 1 cup Peanut Butter
  • 1 cup Sugar + more for dusting
  • 1 Large Egg
Instructions
Combine egg, sugar and peanut butter in a bowl. Once well mixed, spoon small amounts of cookie dough on an ungreased cookie sheet. Next, we dip a fork into a small amount of sugar and make the crisscross pattern on each cookie. We re-dip the fork for each cookie. Place cookies in oven and bake at 350 degrees for 12-15 minutes until the cookies are no longer shiny and look dry on the edges.
Powered by Recipage

Thursday, June 11, 2015

The Best Ever Vegan Cupcakes

I have started to experiment with dairy-free cooking because Kid 3 has had some major stomach issues when she eats dairy. She has been feeling sad that everyone eats junk food and they can go about their day feeling fine while she almost instantly gets a stomach ache. She's tried using the Lactaid pills but she really hated having to take them every time she wanted to eat something with dairy.

I started searching on Pinterest for dairy-free recipes to make for Kid 3. I found an excellent oatmeal chocolate chip recipe (I'll post about that soon!) and I found this recipe. The recipe is from babble.

I followed the recipe exactly. We used plain, unsweetened almond milk for the non-dairy milk and I used Canola oil, because that was all I had on hand. For the frosting I used Smart Balance butter, again because that was what I had. The frosting was a tad oily but I think it has to do with the butter, it is an oil-based dairy-free butter. We were able to make 24 mini cupcakes with the recipe. The batter was very thin so we were worried it wouldn't rise but they turned out great!

The perfect bite-sized cupcake
We devoured the cupcakes in a matter of hours. All of the girls loved them and no one missed the dairy. This will be our new go-to recipe for cupcakes.

Wednesday, November 13, 2013

Wordless Wednesday: Fall

My Wordless Wednesdays are never wordless. Oh well. I took this picture a few days ago we drove through a local state park. I would like to build a house right in the middle of this road!!!

fall colors


Fall in Tennessee is GORGEOUS!

Sunday, November 3, 2013

One Year


We sold almost all of our belongings and left our home in California for the open road one year ago! I can't believe we did it. I never thought we'd ever move out of California. I was born and raised there and although I always dreamed of moving away I never thought we would. The timing never seemed right and I was worried I'd miss my family too much.

Most days I'm happy about the decision. Our kids got to see so much and learn more than I could ever have hoped while we were traveling. Some day, though, I feel guilty for taking them away from their friends. The girls had such good friends in California I worried they wouldn't find such great people wherever it was we ended up. So far they've made a few good friends so that makes me happy. But, the guilt some days makes me want to load up our car and drive back to California, plop back down on the mountain we lived in and try to go back to "normal" life.

I try to remember that people move. Sometimes you can't stay in the same place forever. I think about my sister-in-law. Her husband is in the Army and they have moved all over the country during his time with the Army. They just moved recently from Georgia to Missouri and before that I think they were in Florida, before that Texas. It makes me thankful that Rob isn't in the Navy anymore, I couldn't image having to move over and over again with really no say in where you go! I am thankful that we chose to move to Tennessee and if we want to, we can choose to leave Tennessee.

Tennessee
Camping in TN, when we fell in love with the state (Nov 2012)
I love Tennessee and I'm so glad this is where we ended up. I love waking up each morning and looking out the windows. I love that it's Fall right now and the leaves are the most beautiful colors I've ever seen. I love that it's cold outside, so cold I have to wear a sweater. I love that we go outside as much as we can here. We live by so many parks, lakes and rivers that we never have a hard time finding something to do. Back in California we lived in the mountains so the weather back home isn't too different than here. Only back home we got tons of snow, here not so much. I will miss the snow!

Nashville, TN
Nashville TN, our home 2013

Thursday, October 17, 2013

Sweet Halloween Fun #JELLOHalloween #sponsored


The girls have been begging me to decorate for Halloween. I'll admit, when it comes to decorating for holidays I'm pretty lazy. I finally gave in and helped the girls decorate a little bit around the house. 

I surprised the girls with a fun snack to eat while decorating. While they were at school I made JELL-O's Halloween JIGGLERS Hands. The girls love theme snacks so I knew they'd get a kick out of these hands! 

JELL-O JIGGLERS

I modified the recipe just slightly. I used Raspberry and Strawberry flavors since those two flavors are the  favorite flavors around here. I've never mixed flavors before so I was nervous but I will say it was probably the best tasting JELL-O I've ever had! I will forever mix these two flavors.

JELL-O JIGGLERS HAND
JELL-O Hand

I was worried that cutting the JIGGLERS without a cookie cutter would be hard but it was fairly easy. The hardest part though, was getting the JIGGLERS out of the pan. I used a glass pan, it would have been much easier to get the hand out had I greased the bottom of the pan. I thought about doing that but since the directions didn't say to, I didn't. I also had a hard time seeing where I had cut.  I was able to get all those little hands out of the pan and on to plates for the kids.


I cut up the scraps and called them worms. C really loved the worms, she had fun putting sprinkles in them to give the worms eyes. G chopped up her scraps and called the mess a brain.

JELL-O Worms

The brain got me thinking! I'm going to make green, slimy zombie brains for Halloween. I'll use Lime JELL-O and I will make it in the glass pan, once the JELL-O is set, I'll chop it up, or let the kids do it, and make little brain piles. We can stick some bug candies in the brains to make them look extra creepy.

All of the JELL-O JIGGLERS recipes are quick, simple and fun. Which makes them perfect for me, I love fast and easy!

If you're interested in the rest of the JELL-O JIGGLERS Halloween recipes you can find them here:
  

Creepy Crawly JIGGLERS
MMMMonster JIGGLERS
Halloween Cat Eyes JIGGLERS
Halloween JIGGLERS Hands


I was selected for this opportunity as a member of Clever Girls Collective and the content and opinions expressed here are all my own.

Thursday, September 19, 2013

Welcome to Tennessee

Guess who is following in my footsteps and now living in Tennessee?? MY PARENTS! Yep, they loaded up their RV and left Arizona in the dry, hot dust!

My parents came with their RV, boat, car and a small trailer. Dad drove the RV and towed the trailer, Mom drove the car and towed the boat. They made excellent time considering they got a flat tire on the RV in New Mexico, a cracked windshield on the car in Texas and they got lost in Oklahoma. They left Arizona late Sunday night and arrived at our house Wednesday afternoon.

mom and dad in TN
It has been awesome hanging out with them and I am so glad they are here. We've already gone to a parade and ate a few dinners together. We are taking them to Cracker Barrel tomorrow for their first time and then the zoo this weekend.

I hope they will not regret their decision to leave my brother alone in Arizona. He has a girlfriend, chickens, dogs and a rabbit to keep him company.

I feel pretty cruddy about him being there with no family. We aren't close- we don't talk, or hangout, or text, or anything. I don't know why, maybe because we are extremely different and five years apart. I love him and I wish we were close but I don't think it will ever happen, he doesn't care enough to make an effort. Who knows, maybe he'll end up out here too and then he'll be forced to be around me and my crazy kids! At least on holidays...

Tuesday, September 10, 2013

Kid-Friendly Tablet Accessories Giveaway -Free eBook with Entry

Kid-Friendly Tablet Accessories Giveaway
Get a FREE eBook When You Enter!

Tablet Accessories Giveaway

Hosted By: KiteReaders
Sponsored By: KiteReaders

KiteReaders is thrilled to host and sponsor a Tablet Accessories Giveaway! We have an amazing selection of some of the most popular kid-friendly accessories available for your tablets out in the market today! We all know how difficult it can be to maintain your tablet when you have a young child who always wants to use it. Whether you want to protect your tablet with a kid-friendly case, use a handy stylus instead of your fingers to touch the screen, or simply accessorize your tablet with some awesome headphones, we’ve got you covered! 

When you enter the giveaway, not only will you have the chance to win one of these highly coveted prizes, but you will also be able to immediately download one of our award winning titles…for FREE! Simply enter the giveaway below and read more to learn all about our 20+ amazing prizes!

a Rafflecopter giveaway
Giveaway Rules: US Residents, 18 years and up only. 1 entrant per household. Winners will be picked randomly through the Rafflecopter entry form. Winners will be emailed and will have 48 hours to respond before a new winner is chosen. 

All winning entries are verified.  

Prizes Include: 

Gumdrop Kindle Fire Case (Valued at $49.99): 1 Winner
If you’re looking for the most rugged, durable yet ultimately affordable Kindle Fire protection, you found it in the Drop Tech Series Kindle Fire Case. Shock Absorption, drop protection, extreme ruggedness and hard-core readiness for all adventures, the Drop Tech Series Kindle Fire case specifically conforms to the shape of the Kindle Fire and offers multiple layers of protection. This transformer case features a unique, snap-on integrated screen for maximum protection. (http://www.gumdropcases.com/kindle-fire.html)

iPad Smart Cover (Valued at $39.99): 2 Winners
Snap the Smart Cover into place and it wakes up, stands up, and brightens up your iPad. It magnetically aligns for a perfect fit. It wakes and sleeps your iPad on open and close. It’s a handy stand for reading, watching, and typing. And it’s a way to make your iPad as personal on the outside as it is on the inside. (http://www.apple.com/ipad/accessories/)

iGuy iPad Case (Valued at $39.95): 2 Winners
Say hi to iGuy. He’s fun, free-standing and kid-friendly. Designed to fit all full-size iPads – even the new iPad 4! (http://www.speckproducts.com/iguy-for-ipad.html)

Fisher Price Kindle Fire Kid-Tough Apptivity Case (Valued at $29.99): 2 Winners
With a Kid-Tough rubberized casing and a clear film over the screen to protect against drips and sticky fingers, the next time your child asks to play with your Kindle Fire, you’ll be much more likely to say “sure”! (http://www.fisher-price.com/en_US/brands/kidtough/products/67522)

Griffin Technology Cinema Seat (Valued at $24.99): 2 Winners
CinemaSeat turns your iPad into the perfect in-car entertainment system. CinemaSeat’s wide, adjustable strap routes around your car seat’s headrest to perfectly position your iPad for backseat riders. Without sacrificing access to Multi-Touch display, controls or headphone jack, CinemaSeat lets them watch video, listen to music, play games and more. CinemaSeat gives your riders the best seats in the house. Or car. (http://store.griffintechnology.com/cinemaseat-2-for-ipad)

KaZoo MyPhones (Valued at $19.99): 2 Winners
KaZoo MyPhones have built-in-volume-limiting circuitry that keeps the sound pressure down to levels recommended as safe for young ears. Exposure to excessive levels of sound is more than a nuisance. It’s a health issue, especially for children. KaZoo MyPhones use a built-in, always-on sound-control circuit to cap peak volume levels at 85 decibels. That’s the maximum level recommended by many auditory health organizations in the U.S. and abroad. And, of course, KaZoo are kid-friendly with fun animal designs and durably constructed. (http://store.griffintechnology.com/kazoo-myphones)

Felix TwoHands Stand (Valued at $19.99): 2 Winners
When you want to use your NOOK hands-free, this ingenious accessory is the perfect solution. Made of sturdy molded plastic, it opens with a gentle squeeze and securely grips the edges of your NOOK, while the base rests on a flat surface to form a sturdy stand. The spring mechanism is both strong and flexible, so the Felix will hold your NOOK in either landscape or portrait mode; when closed, it’s only 7″ long, so it will easily slip into a pocket or bag. Add in the sleek, distinctive look – enhanced by a “felix” logo script printed in silver – and this is truly a must-have item for every NOOK owner. (http://www.barnesandnoble.com/p/home-gift-twohands-stand-in-black/25719436)

Crayola Color Studio iMarker (Valued at $15.99): 2 Winners
iMarker is the key to unlock limitless discovery and play on your iPad. It’s a digital marker, crayon, pencil and paint brush that interacts with the Crayola ColorStudio HD app to create all your favorite Crayola colors on the iPad’s Multi-Touch display. As you color, animated characters, music, sound and visual effects bring scenes to life, and surprises await on every page. (http://www.griffintechnology.com/crayola/colorstudiohd)

Marware UpSurge Speaker (Valued at $9.99): 2 Winners
The Marware UpSurge Mini Speaker delivers crisp, distortion-free sound from virtually any media player device. The UpSurge travels with you wherever you go, providing rechargeable, long-lasting audio enhancement in the palm of your hand. Its compact design twists and extends when in use for enhanced bass and sound quality. The UpSurge Mini Speaker is the perfect solution for your portable audio needs, whether you’re watching a movie, listening to music or playing a video game. (http://www.marware.com/upsurge-mini-speaker)

KiteReaders Stylus (Valued at $5.99): All Winners!
The KiteReaders Stylus is the perfect accessory to use on any of your touch devices! With a pen on one end and a stylus on the other, this stylus is a great tool to have in your pocket or bag at all times! 

KiteReaders is a multi-award winning digital publisher of children’s books. With over 100 titles and 30 best sellers across Amazon, Barnes & Noble, and iBooks, KiteReaders aims to provide quality content for children and their families and increase literacy around the world. Visit KiteReaders at http://kitereaders.com and like them on Facebook at http://facebook.com/kitereaders!

Thursday, September 5, 2013

Shredded Chicken Enchiladas

We love Mexican food here. I think at least half of what we eat each week is some sort of Mexican food, or takeout pizza.

I make simple chicken enchiladas for the family. The girls all eat it up and they usually don't complain. Almost every dinner we eat someone has something to say about something they don't like that we are having. This is one dinner I don't have to modify or make different versions of for the girls.

If you know me, you know I hate measuring so I'll do my best to give you the correct measurements.

Shredded Chicken Enchiladas:

Ingredients:

3 pounds boneless, skinless chicken breast
1 white onion
a few shakes of salt
a few shakes of pepper
a pinch of red pepper flakes
3 tablespoons taco sauce (we use mild)
2 cups shredded cheddar cheese
1 small can of sliced olives
1/4 cup of green onions, chopped
28 ounce can of enchilada sauce (we used to use La Victoria but we haven't found it out here, now we use   Las Palmas. I like La Victoria better)
Corn tortillas, about 20-30 (we buy a small pack and use almost all of them)

Directions:
Season chicken breasts with salt, pepper and red pepper flakes. Place in CrockPot. Top with taco sauce. Allow meat to cook on low 6-8 hours.

Once the meat is cooked, remove from slow cooker and allow to cool for 15 minutes. While meat is cooling warm tortillas on a baking sheet in the oven at around 250 degrees, about 10 minutes. 

When chicken is cool, shred with two forks.

Pour 1/3 of the can of enchilada sauce in the bottom of a baking dish.

Place a tortilla flat on a plate or cutting board, fill with a small amount of chicken in center (about 4 tablespoons worth) and roll. Place in the baking pan. Continue rolling tortillas until you run out of meat or tortillas. Place rolled tortillas in the baking pan. Sometimes we use more than one pan because we make so much.

Top enchiladas with remaining sauce so that all tortillas are covered. Layer cheddar cheese on top. Then, add olives and green onions. Bake at 350 degrees for 30-45 minutes. Enchiladas are done when cheese is fully melted.

Makes approximately 20-30 enchiladas.


Sunday, August 25, 2013

Savannah, Georgia

We wanted to do an end of summer trip to the ocean. Since we didn't have much time (school started the following Monday) and our budget was tight, we chose Savannah.

Tybee Island

Now we can say we have officially made it coast to coast. We can all say we've swam in all of the oceans surrounding the U.S. We have spent countless hours in the Pacific Ocean (shoot, I spent my whole childhood in the ocean), we have splashed in the Gulf of Mexico and we have now swam in the Atlantic Ocean.


downtown Savannah
Downtown Savannah
Savannah horse
Savannah

this was near our hotel. I think it's closed down but I loved it anyway
Savannah is beautiful. It was a gorgeous drive from Tennessee through Georgia. Here's the thing though, I will never live in Georgia. The reason? The humidity is murder!! Oh my gosh, the air was so thick it felt like I was being suffocated by the air every time we were outside. I wanted to curl up on the ground and say "please stop hurting me!" It was terrible!! I hate being hot and I hate sweating even more. As soon as we would step out of the car or hotel room I would be drenched. Poor C walked around with a permanent red face because she was so hot. Now I know why my friend in Georgia spends her summers back in California (aside from all of her family being there)!! Almost all of the photos I took were through the car window! It was just too hot to spend much time outside. I must say, the humidity in Tennessee (at least where we live) is nothing compared to Georgia!!
colonial cemetery
Very old cemetery. Downtown
crooked graves
daddy and Clarge tomb
The humidity sucked so we didn't spend much time outdoors. We went to the beach thinking we'd get some relief. Ha!! The ocean in the East is nothing like the ocean in the West. Back in California you get the cool coastal breeze, sometimes it's cool enough to need a sweater, even in the summer! Not in Georgia!!! We were dripping in sweat from the short walk from the car to the ocean. And the sand was so hot it felt like we were walking on hot coals!!
tybee island sharkTybee islandwind in her hairSavannah harbor
beach house
I loved this beach house! I wish it was mine (but maybe somewhere less humid!)
The beach was beautiful and the water was nice and warm. That should have triggered the signs we saw when we were in Texas. The signs warning about jelly fish. But, it didn't. We all bounced around and played in the water. At one time, I looked at the crowded sand and thought "why isn't everyone in the water?" Then, about five minutes later I felt like my foot was going to fall off. The pain was so bad, it felt like a million tiny needles stinging my foot. I freaked out, screamed and ran out of the water. G and Rob both got stung by jelly fish, too. Luckily the rest of the girls didn't get stung. A jelly fish sting is a weird thing. After, I felt like I had earned some rite of passage, like I had joined the jelly fish stinger club. I also thought that everyone should be stung at least once in their life, it's such a strange feeling that it's hard to describe if you haven't felt it for yourself.
Savannah coastenjoying the oceanAtlantic Ocean
swimming in the oceanfun in the sunat the beach
splashing in the sea
When we were leaving the beach we noticed a girl getting sprayed by a lifeguard. She had been stung by what looked like a thousand jelly fish. Her whole body looked swollen and red, I felt so sad for her. She was probably in her 20s and she was in tears from so much pain. I don't want anyone to feel that! Just the sting I felt on my leg :)

Rob's sister lives in Savannah. We tried to meet up with her but we had such a short window of time down there that we didn't get to see her. I'd like to say we'll see her next time but I'm not sure I can handle that heat ever again!! 
eating a peach
enjoying a peach before we left for home
asleep
she fell asleep on the way home

Saturday, August 17, 2013

Join Me on Sverve

Note: this post contains affiliate links

Sverve Banner

Are you looking to expand your blog audience and connect with brands? If so, Sverve is what you are looking for!

I have been a member of Sverve for a few months now and I love it. I have found great blogs to follow from the Sverve community. I have also worked on several campaigns, as well. Sverve is user-friendly and easy to navigate. Sharing tips is simple, just use the Sverve Bookmarklet tool to add your posts to Sverve directly from your blog. Applying for brand opportunities is simple, just look through the list of current campaigns and apply for those that align with your blog.

The Sverve dashboard:

my Sverve dashboard

A little more info on Sverve for you: 

Sverve is a fun social networking community of bloggers.

Bloggers can build their brand by sharing tips on Sverve. Sharing your blog posts allows for other Sverve members to see your posts, increasing your blog exposure. From the Sverve platform influencers can share, like and comment on tips.

It's easy to get started, just click here and follow these steps:

Sign up for an Influencer account
Add your five areas of influence
Ask your social media followers to endorse you
Share your posts on the Sverve platform
Apply for brand campaigns
Follow and endorse your favorite influencers (don't forget about me!!)
Related Posts Plugin for WordPress, Blogger...